

A customized, built-in closet with tons of space for everything a girl could want: this project has been on my wishlist since we bought our house, but time and money were always the factor. I decided months ago that my tax return money would be going to this beauty, if I could find a cost-effective way to do it.
Today’s post is all about the building and installing of this wonderful, wonderful system. I do have plans to paint and glam up the space a bit, but those will be for a later day!

The specs on this space:
This room is long and skinny (15’ by 7’)…and tough to photograph. The master bedroom actually has three closets—two standard size closets on each side of the little hall that leads to the master bath, and then this large walk-in. The big closet is all mine. When we moved in, all the closets had those standard Rubbermaid wire shelves. This is fine in areas like the pantry or the hall closets, but for my walk-in master, I wanted something more organized and a little more upscale.
The project:
We’ll file this one under weekend project, although it could be a slightly more extensive weekend project, especially if you’re like me and can only work on it during certain hours. (Like when the kids are asleep or otherwise occupied in the playroom.) It is absolutely a two-person project, with bonus points if one of those people is good at finding studs and exact measurements. (Rob did that part for me, and deserves all the credit for taking care of the more tedious details!)
Total cost:
Under $350 for the entire closet system. And that’s including the Skubb hanging storage units, so I can plan out my outfits for the week. (The other boxes and containers were things I already had, but most are also Ikea and very affordable!)
For before and after pics, plus the entire process, read on!

Before: Boring shelves and lots of wasted space.
Decision time:
Despite my constant attempts to pare down, I have a lot of clothes, shoes, and accessories, and I wanted one central place where I could house all of it. The Rubbermaid racks hung along the back long wall as well as the adjacent shorter wall. The size of the closet itself provided a lot of hanging space, but there was a lot of wasted space and 100% hanging wasn’t very effective for storage. I had a table in the corner of the closet with all my jewelry and nail polish. It didn’t really work with the room, but I wanted all that stuff easily accessible as I was getting dressed. And I had a dresser out in the bedroom, which held socks and undies and any folded items which didn’t really have a place in the closet. I wanted to be able to keep everything in the closet, and have it be an effective space.
I had been eying the Pax system from Ikea for more than a year, and I was pretty sure that was the direction I was going to go. When I started taking measurements for the room, I realized that the Pax system, which resembles a full built-in, was quite deep and was going to take up a lot of floor space and make my good-sized closet seem less spacious. For the price I was looking to pay ($400-$500), I was only going to be able to do about 2/3 of the long wall in my closet—and it left me no solution for my shoes. I started looking into other options, and stumbled upon Ikea’s “little sister” closet system, the Algot.
The Algot is completely customizable, just like the Pax, but because of its less-intruding use of space, it works better for smaller places (or for maximizing the space inside a larger spot). It has a little bit more of an open-concept feel, and it’s super easy to change around the components inside if you decide you’d rather have a different layout. It is also by far the most affordable option out there in its category. I spent way less than I would have on a Pax, and I still got an extensive system that stores everything I need, plus gave me a shoe/accessory wall! Installation did take awhile and involved a tiny bit of trial and error, but overall the process was very simple. So far, I am a huge fan and highly recommend the Algot.
So here’s what we did:
Before you begin:
You are going to have to have a pretty good idea about your new closet layout and functionality. I worked in retail for several years and frequently worked floor sets. This system is very similar to what they use in stores: it’s vertical strips mounted into the wall studs, then brackets which hook into the mounts, and all your pieces such as shelves, rods, and drawers clip into the brackets. I drew out a sketch of what I needed from my closet, in terms of columns.

My sweet sketches of what I planned to do and some cost estimates. Yes, I use an old Lilly agenda for note-taking!
Each column is roughly 25” wide, the width between your studs. To cover the entire long wall of my closet, I needed five sections, and for the shoe wall, I used two. This meant I needed nine wall mounts total, plus all the shelves, brackets, rods, and extras for the inside. Currently, Ikea does not offer an Algot planner online, so your drawing will need to be pretty detailed so you can count exactly what you need before you shop. I ended up needing about 50 brackets and 30 shelves, so my advice is to plan and count carefully. Depending on how big your system is, there are a LOT of parts that can go into it and it can be easy to miss a piece if you’re not totally sure what you’re doing.
Step 1: Clear out the closet.
I dumped everything on my bed and the floor surrounding it. Yikes. I left everything on hangers to make for easy placement later.


Step 2: Take down all the old cheapo racks.
Silly me, I thought this would be the easy part. Turns out all these little mounts in the drywall are actually kind of a pain to get out. It came down to us basically yanking them out of the wall. There was no way around it, and we were going to end up with little holes in the wall no matter what we did. Ugh. So then the next step involved patching the wall. The logical next step would be to paint over it once dry, so you could have a normal looking wall and not a patchy mess. But we were on a time crunch (ie, I was anxious to get my closet up and get all my clothes off the bed) so we’ll be revisiting this step the next afternoon we have some free time.


Step 3: Find your studs, and decide how far above the floor/baseboards you’d like your wall mounts to hang.
These wall mounts are about 77” long. I measured about 2.5” above the baseboards, and that’s where the bottom of the mount begins. We marked our studs, and then we had a close idea of where the frames would be mounted.

Step 4: Start screwing in your mounts.
This is where the careful planning and the trial and error comes in. Because of the pieces that connect into the system, like the shelves, if one of the wall mounts is off by even a tiny bit, the pieces won’t fit in. So before we screwed in the entire mount, we used just one screw in each to secure them into the studs. We then placed brackets into the bottom slats, and started inserting shelves into those bottom brackets, to make sure each wall mount was properly spaced from the next. Since we were building the wall starting with the stud on the far right side of the wall, we worked from right to left, making sure the bottoms were spaced first. When we were sure they were, we moved to the top, using the same process to make sure all the mounts were parallel and properly aligned. We fully secured the mounts before putting any of the pieces into the system.

This is how the brackets look when they're secured in the mounts.


Left: The shelf is latched into one of the brackets. Right: Oops, but it doesn't fit in the other side. Time to move the wall mount over a bit and try again.
Step 5: Build out your wall.
If you have your system drawn out ahead of time, like I did, this part is super easy. It took me a few tries to figure out how the brackets secure in the wall mounts, and they can be a bit tough to move. Once I got a feel for the brackets, it was very easy to place everything in order to recreate my picture.

Working from the bottom up proves the easiest method.
Step 6: Put all your clothes and accessories in place.
This was the fun part. It went pretty quickly since everything was already hung and ready to go back in.

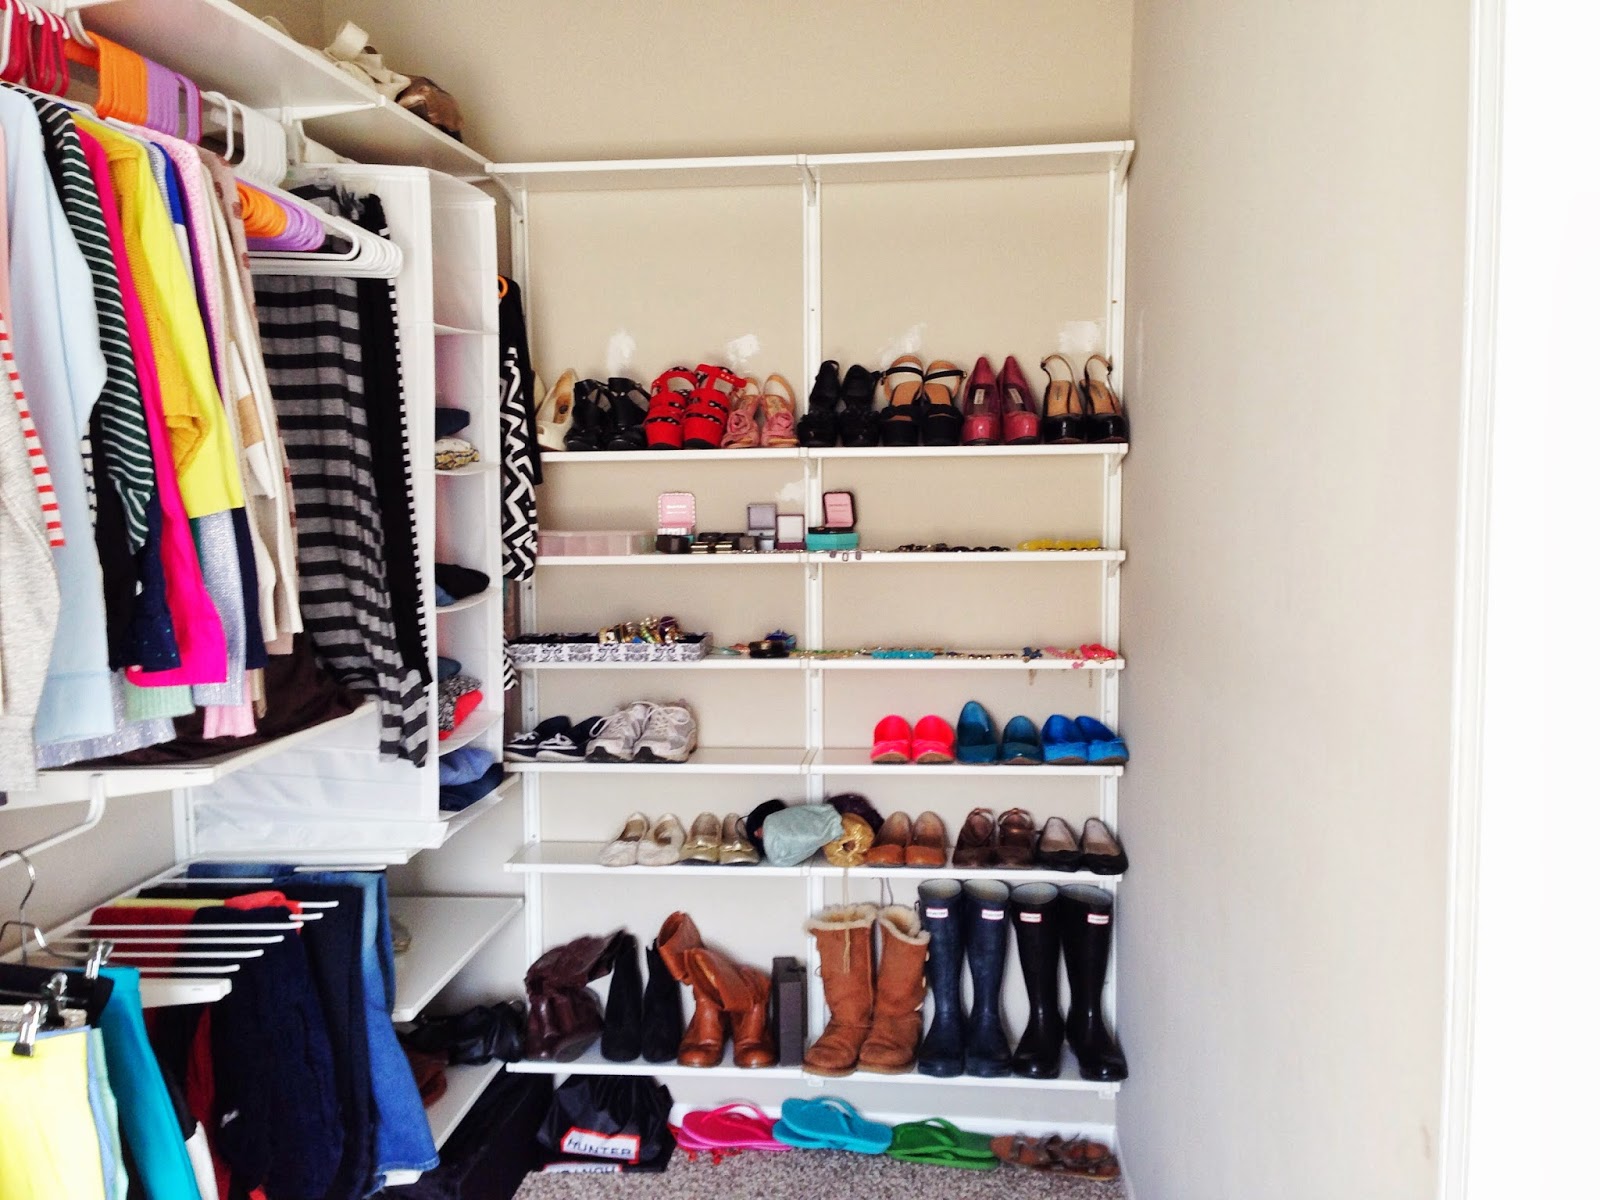
We placed the clothing wall in its entirety before beginning on the shoe and accessory wall.
Step 7: Enjoy your beautiful custom closet!
I still can’t believe it’s installed, and I paid so little for it! It’s everything I needed it to be for now, and it’ll be super easy to update down the road, if I decide I need more. And since I moved the contents of my dresser to the inside of my closet, I was able to get the dresser out of my room and put it in Robby’s room, thus solving two problems. Baby boy now has additional storage in his room, and I have easier access to the things I use every day. (Also, only one place to put my laundry away, which sounds so small but is actually a huge time and patience saver.)

No, Ikea did not pay me to say any of this, nor did they supply me with any of this. (Although I wouldn’t complain if they were to decide to do that.) These opinions are entirely my own. I just have a crazy love for all things Ikea.
Seriously, if you’re looking to redo a closet and don’t want to pay for some of the more pricey systems, consider the Algot. It was much cheaper and easier than some systems out there, and I think it looks quite nice. It's going to be gorgeous once I get it painted and completely organized!
Thanks for reading!


The shelves are fabulous! One question though... are you doing the thing with the hangers where you turn them around if you don't wear something? I've heard that it really helps you decide what to keep and what not to. If I'm totally wrong on why the hangers are turned different... sorry! LOL ;)
ReplyDeleteThank you! And YES, I use the hanger-flip method to track what I've worn in a given amount of time and keep me from wearing the same five pieces all the time! It makes it so easy to see what I'm wearing (or not wearing!) and helps everything stay in even rotation. I highly recommend doing that!
DeleteSooo I feel like I just met my long lost twin! I thought I was the only one who drew detailed diagrams of their closet remodel!?!? And the brown shag carpet---my dream carpet! Great closet!!!!
ReplyDeleteBrianna
http://keepingupwiththekeens2428.blogspot.com/
Haha, yes, I am a nut when it comes to planning. I probably over-plan for everything. But in all honesty, there were at least 200 separate components of this closet system, for the amount of wall we needed to cover! I would have had to make many, many Ikea trips if I hadn't counted carefully beforehand!
DeleteWe bought our home from an investment group who purchased the home from its original owners (built in 2005) and updated the inside to give it a more contemporary look. The carpet/tile flooring was one of the upgrades, and it was so nice to be able to just paint a few rooms and move in without having to do anything else. New carpet one of those things you don't think too much about, but is SO valuable! Having brand new, neutral carpeting across the whole house just really helps it to feel nicer. (And this particular carpet camouflages like you would not believe! That's a big one since we have two messy kids!) I'm a big fan!
This comment has been removed by the author.
ReplyDeleteIf I understand you correctly, your studs were the perfect distance from eachother for this system? Or did you use anchors for some of the wall mounts?
ReplyDeleteYes, we installed all wall mounts into studs. It's a pretty heavy system, especially once clothes are hung, so I would highly recommend using studs for the wall mounts. Our house was built in 2005 and our studs are 24" apart, which is fairly standard, although some homes do have 16" between studs.
DeleteThanks for stopping by!
Hey, I was looking for a tutorial on Algot system, and found your post very helpful! I did, of course, end up miscalculating by about 2 $2 dollar brackets, but aside from making an hour long drive (one way) to pick up the remaining parts, it turned out great. Thanks for posting! :)
ReplyDeleteI bought this system but the studs in the wall are not every 24 " but so it only fits the wider shelves with 33" but not Ikea does not have clothes rails and pant hangers in that size. Do you have any experience with not drilling into the studs and supporting the system?
ReplyDeleteI bought this system but the studs in the wall are not every 24 " but so it only fits the wider shelves with 33" but not Ikea does not have clothes rails and pant hangers in that size. Do you have any experience with not drilling into the studs and supporting the system?
ReplyDeletehow sturdy is the hangging rod? My husbad wears XXL and his clothes get heavy on the hangers...just wondering if this will be sturdy enough??
ReplyDeleteThis comment has been removed by the author.
ReplyDeleteWARNING: Make sure you buy the shelves that are the same length as the clothes rail. They sell the shelves in three lengths, but the clothes rail only comes in one length. We learned this the hard way after buying and installing the wrong size shelves and had to start over completely.
ReplyDeleteThis comment has been removed by the author.
ReplyDeleteDid your Algot system come with screws? They told us we have to buy our own screws
ReplyDeleteRoyal ceilings and walls Perth provides wide range of Gyprock interior Shop Fit Outs, Commercial Building Fit Outs, and Office Partitioning. Whatever you requires we can do! We also specialize in shop fit outs and office partitions.
ReplyDeleteStud Walls Perth
Hello, thanks for this super helpful post, your new closet is looking great!
ReplyDeleteWe're looking at using the Algot system for storage in our bedroom and I was wondering how durable it is long term? We were a bit disappointed when we saw the display versions in our local store as they seemed very flimsy, with baskets coming out easily etc. What's your experience with it now you've had these a while? Would love to get your thoughts.
Thanks loads in advance!
Bethan
Hello,
ReplyDeleteThere is a rail that goes across the top that supports the whole system. We didn't know and we have to go back and get it. You screw that rail into the studs. Here is a link to a guy that did it: https://www.youtube.com/watch?v=Yl3uwiiry7M
I have installed several of these systems, and after getting inside the quirky head of the designer, have boundless admiration for its versatility. It is simple when you know how, but it takes a bit of thought. Here's how I went about it:
ReplyDelete1. Measured the wall (3,200 mm - approx. 10ft).
2. Went into Ikea site, pulled up the Algot suggested configurations, and looked for the closest combination that would fit. In my case, 2,800 mm - approx. 8 ft 8ins. The spare 16" can accommodate a laundry bag / hanging shoe holders, etc. See (http://www.ikea.com/gb/en/products/storage-furniture/storage-systems/algot-wall-upright-shelf-triple-hook-white-spr-49165155/)
3. Asked the store to print off a "picking list". This gave me the number of brackets / shelves / trouser rail hangers / shoe racks / hangers that I needed, with no brain input from me. All I had to do was load up the cart and tick off the items.
4. Installation. My bugbear has always been accurate spacing of the vertical supports. The Ikea system allows you to screw a horizontal bar along the top. If you can't find the studs, I have found that tough nylon screw-in plugs, when screwed carefully into plasterboard, are effective (http://www.screwfix.com/p/rawlplug-self-drill-plasterboard-fixings-nylon-32mm-400-pack/5741f). Pre-drill a small hole, screw in gently, and don't use cheap ones. If in doubt, buy metal.
5. Once the horizontal bar was screwed in place, the vertical bars could be hung from it. This was a bit tricky, but once mastered, the verticals could be shuffled along to the approximate spacing. I put a bracket in the top hole of each vertical, and inserted shelves all the way along. I had to move the verticals a few mm right or left to make the spacing perfect.
I then went to the bottom and put in shelves and brackets.
The result was a fixed horizontal bar, with unfixed verticals, perfectly spaced top and bottom.
I then marked the holes to be drilled in the wall with a pencil, through the pre-drilled holes in the verticals.
I took out top and bottom shelves, one vertical at a time, moved the vertical supports out of the way, then drilled and plugged the walls. Put the verticals back in their proper positions, and screwed them to the walls. Marvellous.
6. I'm doing another one tomorrow, for a one-bedroomed flat with a 10' wall. I'll finish it off with 4 x 30" sliding doors.
Ditto everything David B. said -- I've used the EXACT SAME process he did to do two closets in our 1986-built house (16" stud spacing), and I'm starting on #3 this weekend! It makes my creative and order-loving brain so happy to see what a difference the Algot system has made in our lives, both physically and mentally. Next big Algot project for us: Turn bedroom #5 (intended as a nursery off the master bedroom) into a walk-in closet, giving us a more grown-up master suite. The old reach-in closets in the master will become a second floor laundry (no doubt, with more Algot shelving)! Woot! Cannot wait. Thank you, IKEA!
ReplyDelete